15 DIY Outdoor Halloween Decorations That Survive October
October weather is the sworn enemy of every great Halloween yard display. One windy night can flatten a ghost, a single rainstorm turns cardboard tombstones to mush, and an early frost splits a carved pumpkin right down the middle. The difference between decor that survives the month and decor that quits by week two is rarely budget. It is planning for weather from the very first cut of the saw.
These DIY outdoor Halloween decorations are built like a storm is coming, because in October, one probably is. Every project below is a genuine afternoon build using materials that shrug off rain, wind, and cold: PVC, corrugated plastic, resin, foam, exterior paint, and sealed LEDs. Your yard still looks great on the 31st, which is the entire point.
Most of these cost very little, many reuse things you already have in the garage, and all of them prove the same point: you do not need to spend big to look spectacular. Pick three or four favorites, build them one weekend, and watch your house become the one the neighborhood talks about.
1. Gravel-Weighted Milk-Jug Ghosts

Draw goofy ghost faces on clean, dry milk jugs with a permanent marker, pour a few inches of gravel into each for ballast, and nestle a waterproof LED puck light inside before screwing the cap on. Line them along the front walkway at dusk and you get a glowing ghost parade with zero wiring, zero extension cords, and almost zero cost. The lopsided hand-drawn faces are the charm here, so invite the kids to help with the artwork.
At night these are some of the most photogenic DIY outdoor Halloween decorations you can make, since each jug glows from within and the faces look different from every angle. Space them about a foot apart and slightly offset rather than in a perfect military line for a look that feels collected instead of staged. Refillable jugs are free and endlessly recyclable, so this is also one of the greenest yard projects on this list.
Tip: Mist the marker faces with clear outdoor spray sealer so rain cannot smear the ink, and keep the gravel layer heavy enough that a gust cannot rock the jugs. Outdoor-rated puck lights only.
2. PVC Skeleton Archway

Bend two lengths of PVC pipe into a walkway arch using elbow and tee joints, then zip-tie skeletons, bats, and hanging ghouls along the curve. Wrap the pipes in black landscaping fabric or torn cheesecloth to hide the plumbing-store look, and your guests walk through the decor on their way to the door. It is grand-entrance drama for about the price of a pizza.
The genius of this build is that PVC does not rust, rot, or absorb water, so the arch looks the same on October 31st as it did on day one. Keep decorations light enough that the arch stays balanced, and add a battery spotlight at the base aimed upward for a nighttime silhouette that photographs beautifully. This is one of those outdoor Halloween decor ideas that neighbors will ask you about for years.
Tip: Slide each PVC leg over a length of rebar driven deep into the ground so the arch cannot lift or wander in wind. Sandbags at the base add extra insurance on loose soil.
3. Chicken-Wire Yard Phantoms

Sculpt ghostly figures from chicken wire: a crumpled ball for the head, a tapered torso, a flowing skirt that flares at the bottom. Drape white outdoor fabric or torn bedsheets over each form and place a solar spotlight behind them. At night they read as genuine apparitions rising from the lawn, especially in moonlight or drifting fog.
These are genuinely eerie in a way plastic decorations never manage, because the fabric moves in the breeze and every viewing angle gives a different silhouette. Vary the heights to create a family of phantoms, tall ones near the fence and small ones creeping toward the sidewalk. A few scattered around dark corners is far more unsettling than a crowded display, so practice restraint.
Tip: Use galvanized wire so nothing rusts in October rain, choose outdoor-rated fabric that will not rot, and stake each figure with a tent stake through the wire base so gusts cannot tumble them.
4. Sealed Faux-Pumpkin Luminaries

Carve or drill patterns into foam pumpkins, set a solar or battery LED inside each, and line your porch steps with them. From the street they pass as real jack-o’-lanterns, but they never rot, never cave in, and never attract fruit flies. Mix classic carved faces with drilled dot-patterns and swirling designs for a modern glow alongside the traditional grins.
This is the classic Halloween porch look without the classic pumpkin headache. Real carved pumpkins start to collapse within a week in warm falls and much faster after frost, while foam versions hold crisp edges all month. A set of five or six on staggered steps reads as intentional and generous, and they store flat in a box to return next year.
Tip: Foam is waterproof, so wind is the real enemy. Hot-glue a stone or a small sandbag inside each pumpkin’s base to keep them from skittering across the porch in a storm.
5. Tire-Stack Haunted Totems

Stack two or three old tires, spray-paint them matte black, and paint a bold spooky face on each one: a mummy on top with wrapped bandage strokes, Frankenstein’s monster in the middle, a grinning pumpkin on the bottom. Cap the stack with a foam pumpkin and you have folk-art Halloween with real presence that weighs far too much for any wind to move.
Among DIY Halloween yard decorations, these totems have serious staying power because they are heavy, chunky, and intentional-looking from the curb. Old tires are free for the asking at most tire shops, and the bold simple faces suit the rough rubber texture perfectly. Rough wood, rubber, and rope improve the homemade-monster look, so do not fuss over precision.
Tip: Drill a drainage hole in the lowest tire’s sidewall so rainwater cannot pool inside and breed mosquitoes. A clear outdoor topcoat keeps the painted faces vivid through storms.
6. Solar Lantern Graveyard

Arrange foam tombstones in a mulched flower bed with a solar path light staked behind each one, so every stone glows at night. Add a short pallet-slat picket fence around the plot and a few plastic bones scattered in the mulch. Simple stones become haunting cemetery silhouettes with almost no effort and no wiring.
The solar lights do the heavy lifting here. By day the graveyard is a tidy landscaped bed; after dark it becomes the spookiest corner of the yard, all powered by the sun. Place the taller stones toward the back and smaller ones up front for depth, and keep the mulch dark and fresh so the pale stones pop. This is one of the most reliable outdoor Halloween decor ideas for big visual payoff.
Tip: Stake the solar panels where the house will not shade them during the day, and wipe them once a week. October dust and falling leaves kill charging speed fast.
7. Corrugated-Plastic Tombstones

Cut tombstone shapes from fluted corrugated plastic boards with a utility knife, spray them gray, sponge on darker shading around the edges, and letter funny epitaphs with an outdoor paint pen. From the sidewalk they pass as weathered stone, yet each one costs almost nothing and weighs almost nothing. The plastic cuts easily but stands rigid once staked.
This is a budget graveyard that fools the eye. Vary the shapes, rounded tops, crosses, obelisks, and add faux cracks with a fine brush so the collection looks like an old cemetery instead of a set of matching clones. Paint pens meant for outdoor use keep the epitaphs readable through rain, and the whole set stores flat in a garage rafter.
Tip: Mount each stone on a wooden stake driven deep into the ground so wind cannot snap the flutes. Stakes behind the stones, not in front, keep the look clean from the street.
8. Storm-Anchored Inflatables

Keep your giant inflatables but install them like a tent instead of a toy: every guy-line staked into the ground, the blower plugged into a covered outdoor outlet, and a sandbag on each tether point. Go big or go home, but anchor like it, and your inflatables stay plump and upright instead of deflating into sad puddles at 2 a.m.
Inflatables deliver the biggest curb presence per dollar of anything in outdoor Halloween decor, which is why they are worth doing right. A properly anchored twelve-foot ghost survives gusts that would shred a flapping fabric decoration, and a cheap outdoor timer runs the blower during evening hours only, saving electricity and extending motor life. Evening-only runtime also keeps the display feeling like an event, not background noise.
Tip: When winds push past 30 mph, unplug and lay them flat rather than fighting the storm. Store the fan in a dry bag and bring electronics inside during heavy rain warnings.
9. Weather-Sealed Front-Door Wreath

Build a grapevine wreath with faux black roses, small plastic skulls, and a burlap bow, then coat the entire thing with two layers of clear outdoor sealer. This is your door’s handshake with the street, the first decoration every visitor actually sees up close, and sealed properly it looks fresh all month instead of rain-battered by week two.
Grapevine holds up outdoors better than most wreath bases because the twigs are naturally tough, and the sealer keeps the faux roses from fading and the burlap from going limp in rain. Cluster the skulls and roses in one lower quadrant for a modern asymmetric look, or spread them evenly for classic fullness. Either way, this is the cornerstone of great Halloween porch decorations.
Tip: The sealer waterproofs the vine and stops UV fading. Hang it with a wind-rated wreath hook or an over-the-door bracket so it cannot swing and scratch the paint in a gale.
10. Painted Pallet Monster Boards

Stand pallet boards upright and paint each as a classic monster in bold simple shapes: green Frankenstein with neck bolts, a bandage-wrapped mummy, a cape-and-fangs vampire. Lean them against the house, fence, or porch posts in a row. The rough wood grain actually improves the homemade-monster look, so simple shapes and confident color blocks win over fine detail.
These are playful and kid-friendly rather than scary, which makes them perfect for families with small trick-or-treaters. Full pallets have great presence at human height, and the vertical slats give the paintings a folk-art texture that a smooth board never would. Arrange the trio as a lineup along the front of the house for maximum curb impact.
Tip: Paint with exterior acrylics and finish with a clear outdoor topcoat, then elevate each board on blocks or bricks so the edges never sit in wet soil and wick up moisture.
11. Rope-Light Giant Spider Web

Stretch a giant web across the front of the house: black rope for the radial frame lines, warm-white rope light for the spiral, and an oversized spider built from a foam body and pipe-cleaner legs at the center. A ten-foot glowing web turns the entire facade into the display, and neighbors will slow down to stare. This is showstopper scale for a surprisingly small materials bill.
Rope light is the perfect medium here because it is already weather-rated and visible from blocks away. Plan the web shape on paper first, five or six anchor points radiating from the center, then spiral the rope light outward and secure it with zip ties. The spider should be the biggest one you can reasonably build; a small spider on a giant web reads as an afterthought.
Tip: Anchor with screw-in hooks driven into trim or masonry, never adhesive hooks that let go in cold rain. Keep all plugs and connections inside a weatherproof outdoor cord box.
12. Gargoyle Planters

Nestle small gargoyle or crow figures among mums and ornamental kale in your porch planters, then tuck battery-powered fairy lights into the foliage so the figures emerge glowing after dark. It is subtle-spooky landscaping: a pretty fall porch by day that turns quietly creepy at night, without a single screaming animatronic.
This is one of the classiest outdoor Halloween decor ideas because it upgrades planters you already have rather than adding clutter. The gargoyle faces catch the fairy-light glow in a way that feels discovered rather than displayed, and the mums keep the whole arrangement grounded in autumn. Group the figures in odd numbers and half-bury them in the foliage for the best effect.
Tip: Choose resin or cast-stone figures, since plaster crumbles in freeze-thaw cycles. Confirm your planters have drainage holes so heavy rains do not drown the roots or float the figures out.
13. Sealed Mason-Jar Floating Candles

Half-fill mason jars with water, stir in a few drops of black food coloring, add a floating LED candle, screw the lids on tight, and hang them from tree branches or porch hooks with twine. Dark-fairy-tale lanterns sway gently in the night air: simple, cheap, and weirdly beautiful. This is one of the simplest DIY outdoor Halloween decorations on this list and still one of the most magical.
The black water is the trick that makes ordinary jar lanterns feel like witchcraft. The candles glow through the dark liquid as floating orbs of light, and a cluster of jars at different heights turns a bare tree into a chandelier. Battery candles with built-in timers light themselves every evening so you never have to think about them.
Tip: Tightened lids keep rain out and spiders out of the jars. Wherever a jar could fall on a path or be knocked down, use plastic jars instead of glass so nothing shatters.
14. PVC Bone Wind Chimes

Hang capped white PVC lengths at different heights from a wooden ring to build oversized bone chimes, painting faint gray cracks on each with a paint marker. When the wind moves them they knock together with a deep hollow clunk that beats tinkling metal chimes for pure spookiness. It is sound design for your yard, and it costs almost nothing.
Vary the pipe lengths by several inches so the chimes produce different pitches, longer pipes for low notes, shorter ones for higher knocks. Cap the tops to keep rain out and hang the ring from a porch beam where the breeze reaches it. These look convincingly skeletal in silhouette, especially backlit against a porch light at night.
Tip: Hang the chime from a covered porch beam so the wooden ring stays dry. The PVC and nylon cord are fully weatherproof, but untreated wood is not, so seal the ring or keep it sheltered.
15. Driveway Pumpkin Runway Lights
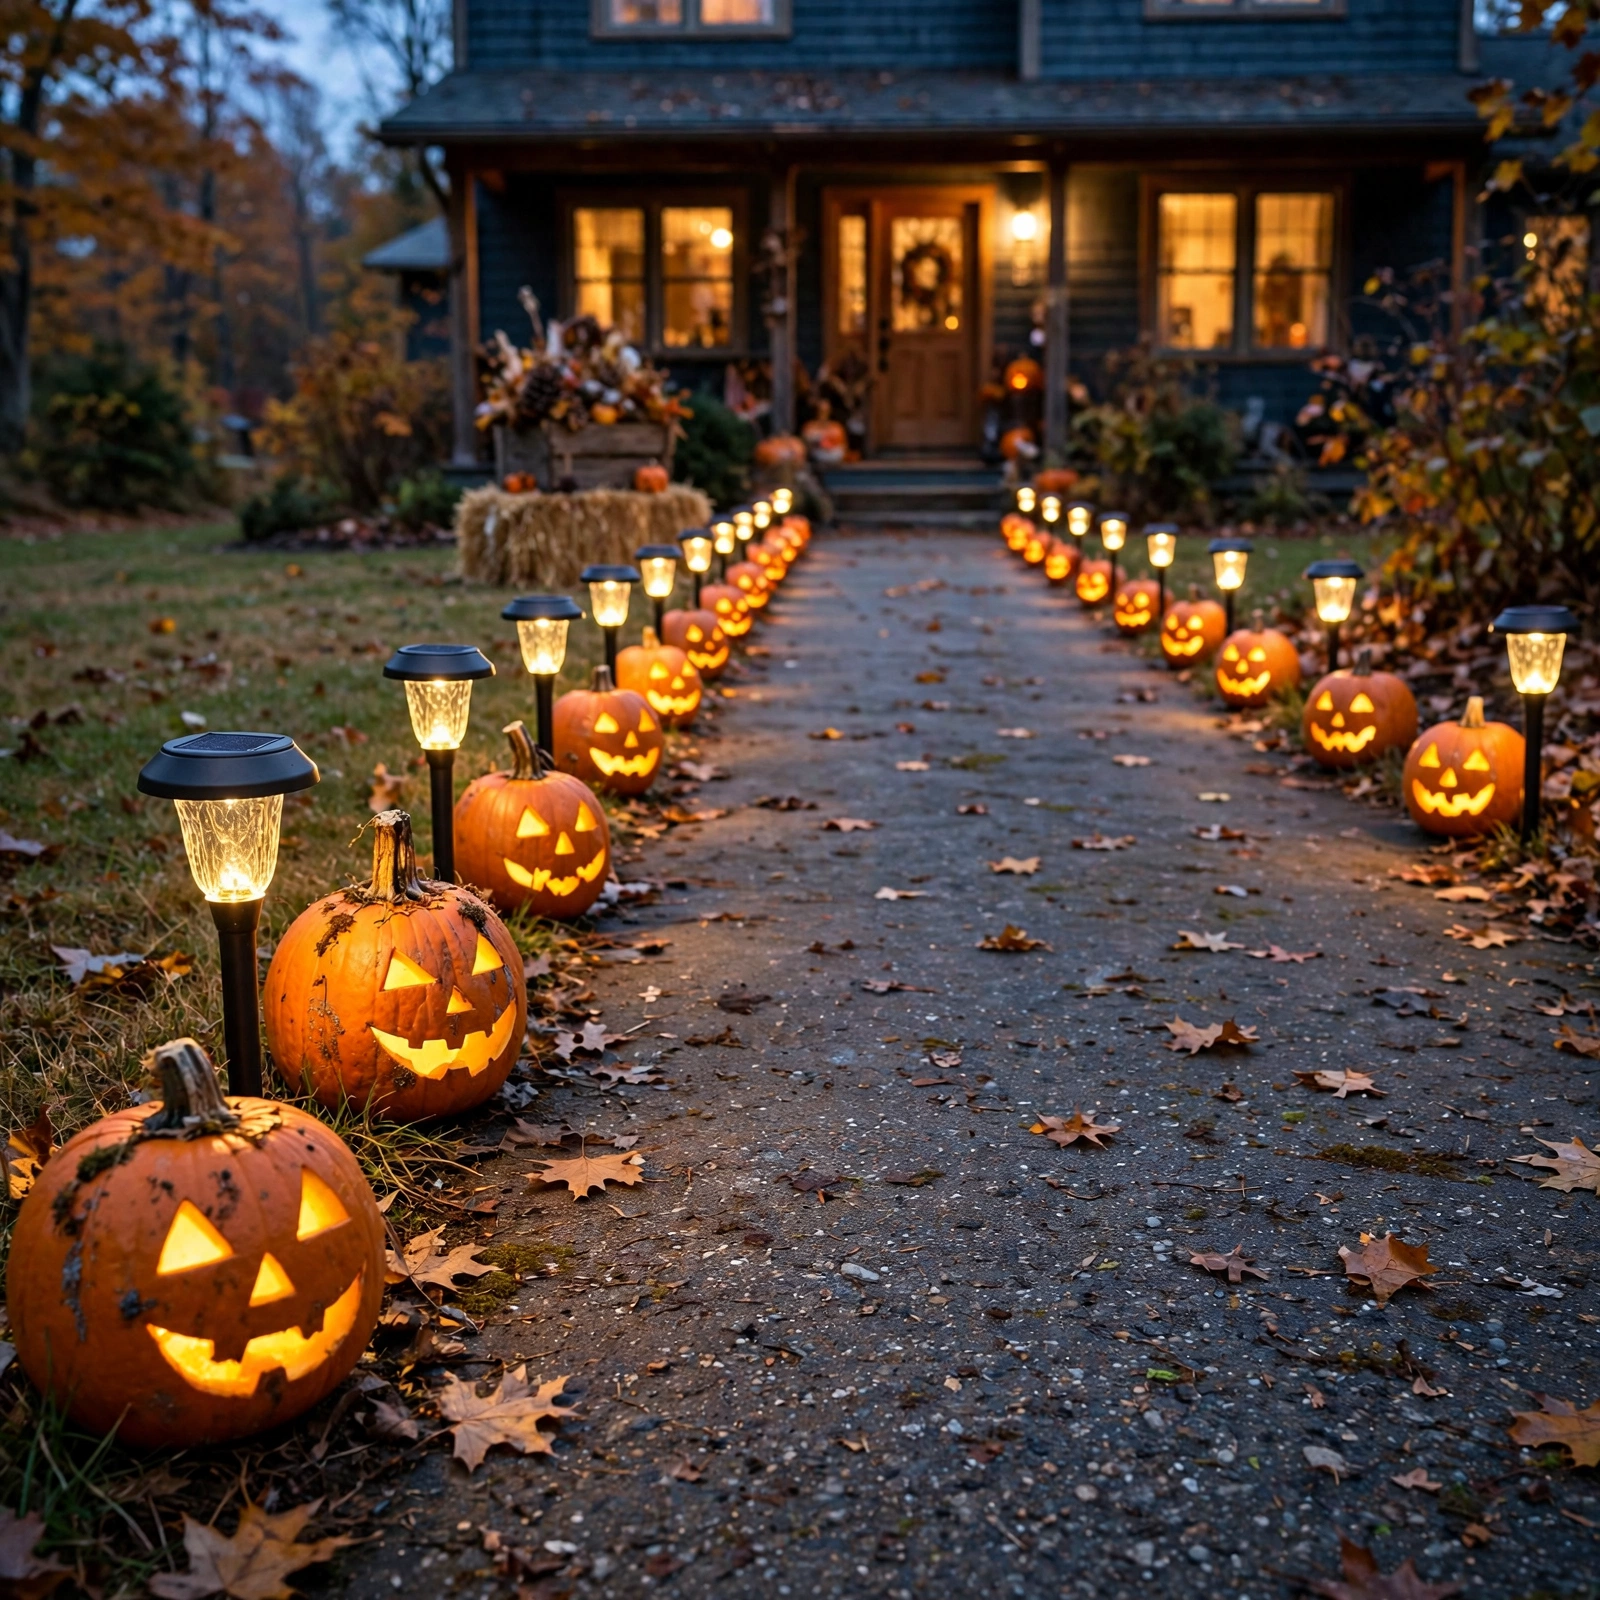
Line both sides of the driveway with small foam pumpkins, a solar stake light planted behind each one, creating a glowing runway that guides trick-or-treaters straight to your door. It is welcoming and magical, and it says this house is ready for Halloween better than any store-bought sign ever could.
The double row creates a sense of occasion that single scattered decorations never manage: the path itself becomes the decoration. Foam pumpkins mean nothing rots if you set them out early in October, and the solar lights need no wiring across the driveway. Space the pairs about three feet apart and keep them clear of the driving surface so cars cannot clip them.
Tip: Push the solar stakes deep into firm ground so feet, mowers, and wind cannot knock them over, and give the panels one full sunny day to charge before the big night.
Frequently Asked Questions
What materials survive October rain best?
PVC, corrugated plastic, resin, galvanized metal, foam pumpkins, and exterior paints are the all-stars of weatherproof Halloween decor. Avoid untreated wood, cardboard, paper, and plaster, which soak up water and fall apart fast.
How do I keep wind from destroying my display?
Weight it, stake it, or tether it. Gravel ballast, rebar stakes, tent stakes, guy-lines, and sandbags each have their place depending on the project. If a piece cannot be secured, bring it inside when storm warnings go up.
Can battery lights stay out in the rain?
Only if they are outdoor-rated, so look for an IP44 rating or higher on the packaging. Indoor-only fairy lights and pucks will short out after a single wet night.
How early can I decorate outdoors?
Weatherproof builds like these can go up in late September without worry. Save delicate details such as painted faces and fabric elements for early October so they spend less time exposed.
What is the cheapest yard lighting?
Solar stake lights bought in multi-packs: no wiring, no battery replacements, no electric bill. Just place the panels in direct sun and let them do the work every night.
Final Thoughts
The difference between decor that dazzles on the 31st and decor that quits on the 12th is rarely money. It is planning for weather from the very first cut of the saw. These DIY outdoor Halloween decorations are built like a storm is coming, because in October, one probably is, and the yard that survives looks all the better for it.
Start with one project this weekend and add another next week. By Halloween your house will be the glowing, spooky, storm-proof showpiece of the street, and every single piece of it was made by you.